Showing posts with label Android. Show all posts

Friday, 16 October 2015

How to set only Numeric password restriction From user Into android app

Numeric password restriction means set automatic restriction so application user cannot enter alphabets, special characters as password. There are a automatic limitation applied on application's EditText box so user are unable to set alphabetic characters, special characters as passwords. It will allow the application to only open numeric keypad .

Setting up only numeric password enter restriction on android application.


Code for activity_main.xml file .

<RelativeLayout xmlns:android="http://schemas.android.com/apk/res/android"
    xmlns:tools="http://schemas.android.com/tools"
    android:layout_width="match_parent"
    android:layout_height="match_parent"
    android:paddingBottom="@dimen/activity_vertical_margin"
    android:paddingLeft="@dimen/activity_horizontal_margin"
    android:paddingRight="@dimen/activity_horizontal_margin"
    android:paddingTop="@dimen/activity_vertical_margin"
    tools:context="com.tutorials2make.getnumericpasswordandroidapp.MainActivity" >

    <EditText
        android:id="@+id/PasswordRestriction"
        android:layout_width="wrap_content"
        android:layout_height="wrap_content"
        android:layout_alignParentTop="true"
        android:layout_centerHorizontal="true"
        android:layout_marginTop="50dp"
        android:ems="10"
        android:inputType="numberPassword" >

        <requestFocus />
    </EditText>

    <Button
        android:id="@+id/GetOnlyNumericPassword"
        android:layout_width="wrap_content"
        android:layout_height="wrap_content"
        android:layout_centerHorizontal="true"
        android:layout_centerVertical="true"
        android:text="Get Only Numeric Password" />

</RelativeLayout>

Code for MainActivity.java programming file .

package com.tutorials2make.getnumericpasswordandroidapp;

import android.app.Activity;
import android.os.Bundle;
import android.text.Editable;
import android.view.View;
import android.widget.Button;
import android.widget.EditText;
import android.widget.Toast;


public class MainActivity extends Activity {
Editable HoldNumericPassword;
Button GetNumericPassword;
EditText GetNumericPasswordinAndroid;
    @Override
    protected void onCreate(Bundle savedInstanceState) {
        super.onCreate(savedInstanceState);
        setContentView(R.layout.activity_main);
        
        GetNumericPassword = (Button)findViewById(R.id.GetOnlyNumericPassword);
        GetNumericPasswordinAndroid = (EditText)findViewById(R.id.PasswordRestriction);
        
        GetNumericPassword.setOnClickListener(new View.OnClickListener() {
@Override
public void onClick(View v) {
HoldNumericPassword = GetNumericPasswordinAndroid.getText();
Toast.makeText(MainActivity.this, HoldNumericPassword, Toast.LENGTH_LONG).show();
}
});
    }
}


How to get Alphabetic, Numeric, Special Symbol password from user in Android Application

On android applications EditText box is applied to demand text from user, text can be any type of

Alphabetic ( A,B,C,D,E,F,G,H,I,J,K,L,M,N,O,P,Q,R,S,T,U,V,W,X,Y,Z )
Numeric ( 0,1,2,3,4,5,6,7,8,9 )
Special symbols ( ! @ # $ % ^ & * ( ) _ + { } " : ? > < | ) .

 EditText box also used to get password from user into android application. Because password is very protective thing and when you enter your password in some one's front you don't want to recognize them your password so android EditText gives us an attribute property to take password from user into android application with showing * ( Star ) symbol every time key enters a password.

How to get Alphabet + Numeric + Special symbol as password in android app using EditText.

Code for MainActivity.java file .


package com.tutorials2make.edittextgetpassword;

import android.app.Activity;
import android.os.Bundle;
import android.text.Editable;
import android.view.View;
import android.widget.Button;
import android.widget.EditText;
import android.widget.Toast;


public class MainActivity extends Activity {

Editable getPassword;
Button GetTextPassword;
EditText EntertextPassword;
    @Override
    protected void onCreate(Bundle savedInstanceState) {
        super.onCreate(savedInstanceState);
        setContentView(R.layout.activity_main);
        
        GetTextPassword = (Button)findViewById(R.id.get_password_in_android);
        EntertextPassword = (EditText)findViewById(R.id.EnterPasswordBoxInAndroid);
        
        GetTextPassword.setOnClickListener(new View.OnClickListener() {
@Override
public void onClick(View v) {
getPassword = EntertextPassword.getText();
Toast.makeText(MainActivity.this, getPassword,Toast.LENGTH_SHORT).show();
}
});
    }

}

Code for activity_main.xml file .

<RelativeLayout xmlns:android="http://schemas.android.com/apk/res/android"
    xmlns:tools="http://schemas.android.com/tools"
    android:layout_width="match_parent"
    android:layout_height="match_parent"
    android:paddingBottom="@dimen/activity_vertical_margin"
    android:paddingLeft="@dimen/activity_horizontal_margin"
    android:paddingRight="@dimen/activity_horizontal_margin"
    android:paddingTop="@dimen/activity_vertical_margin"
    tools:context="com.tutorials2make.edittextgetpassword.MainActivity" >

    <EditText
        android:id="@+id/EnterPasswordBoxInAndroid"
        android:layout_width="wrap_content"
        android:layout_height="wrap_content"
        android:layout_alignParentTop="true"
        android:layout_centerHorizontal="true"
        android:layout_marginTop="83dp"
        android:ems="10"
        android:inputType="textPassword" >

        <requestFocus />
    </EditText>

    <Button
        android:id="@+id/get_password_in_android"
        android:layout_width="wrap_content"
        android:layout_height="wrap_content"
        android:layout_centerHorizontal="true"
        android:layout_centerVertical="true"
        android:text="Click Here to obtain Password form application user" />

</RelativeLayout>


Sunday, 11 October 2015

How to get EditText box entered value on android application

EditText box entered value is accessible by getText() function. This function is used with combination of EditText box id assign variable. After get EditText box value i am showing this selected value on Toast message through button click event.

Code for MainActivity.java file .

package com.example.getenterededittextboxvalue;
import android.app.Activity;
import android.os.Bundle;
import android.text.Editable;
import android.view.View;
import android.widget.Button;
import android.widget.EditText;
import android.widget.Toast;


public class MainActivity extends Activity {

    EditText GetvalueBox;
    Button AccessButton;
    Editable HoldValue;
    
@Override   
    protected void onCreate(Bundle savedInstanceState) {
        super.onCreate(savedInstanceState);
        setContentView(R.layout.activity_main);
        
        GetvalueBox = (EditText)findViewById(R.id.editText1);
        AccessButton = (Button)findViewById(R.id.access_value);
        
        AccessButton.setOnClickListener(new View.OnClickListener() {
@Override
public void onClick(View v) {
// TODO Auto-generated method stub
HoldValue = GetvalueBox.getText();
Toast.makeText(MainActivity.this, HoldValue, Toast.LENGTH_SHORT).show();
}
});
        
    }

}

Code for activity_main.xml file .

<RelativeLayout xmlns:android="http://schemas.android.com/apk/res/android"
    xmlns:tools="http://schemas.android.com/tools"
    android:layout_width="match_parent"
    android:layout_height="match_parent"
    android:paddingBottom="@dimen/activity_vertical_margin"
    android:paddingLeft="@dimen/activity_horizontal_margin"
    android:paddingRight="@dimen/activity_horizontal_margin"
    android:paddingTop="@dimen/activity_vertical_margin"
    tools:context="com.example.getenterededittextboxvalue.MainActivity" >

     <EditText
        android:id="@+id/editText1"
        android:layout_width="wrap_content"
        android:layout_height="wrap_content"
        android:layout_alignParentTop="true"
        android:layout_centerHorizontal="true"
        android:layout_marginTop="47dp"
        android:ems="10"
        android:inputType="textPersonName" >

       
    </EditText>

    <Button
        android:id="@+id/access_value"
        android:layout_width="wrap_content"
        android:layout_height="wrap_content"
        android:layout_alignRight="@+id/editText1"
        android:layout_below="@+id/editText1"
        android:layout_marginTop="45dp"
        android:text="Access EditText Box value" />

</RelativeLayout>


Android EditText person name example tutorial

What is EditText .

EditText view is used to obtain text from user into android application. Its equal as text boxes present in web applications like forms. With the use of Multiple EditText boxes into single application you can make a entry submission form. This is the single line edit text box commonly applied to enter single line person name.

activity_main.xml file .

<RelativeLayout xmlns:android="http://schemas.android.com/apk/res/android"
    xmlns:tools="http://schemas.android.com/tools"
    android:layout_width="match_parent"
    android:layout_height="match_parent"
    android:paddingBottom="@dimen/activity_vertical_margin"
    android:paddingLeft="@dimen/activity_horizontal_margin"
    android:paddingRight="@dimen/activity_horizontal_margin"
    android:paddingTop="@dimen/activity_vertical_margin"
    tools:context="com.Tutorials2Make.edittext.MainActivity" >

    <EditText
        android:id="@+id/editText1"
        android:layout_width="wrap_content"
        android:layout_height="wrap_content"
        android:layout_alignParentTop="true"
        android:layout_centerHorizontal="true"
        android:layout_marginTop="47dp"
        android:ems="10"
        android:inputType="textPersonName" >

        <requestFocus />
    </EditText>

</RelativeLayout>

MainActivity.java programming file

package com.Tutorials2Make.edittext;

import android.support.v7.app.ActionBarActivity;
import android.annotation.SuppressLint;
import android.os.Bundle;
import android.view.Menu;
import android.view.MenuItem;


@SuppressLint("NewApi") public class MainActivity extends ActionBarActivity {

    @Override
    protected void onCreate(Bundle savedInstanceState) {
        super.onCreate(savedInstanceState);
        setContentView(R.layout.activity_main);
    }
}


Tuesday, 6 October 2015

Android Simple TextView example tutorial

Android TextView tag is applied to display user generated text on android applications. TextView tag is the most common generic tag to develop static android apps. TextView tag also gives the facility to change the text bye application developer. TextView dose not function single there are some of it's attributes to provide TextView ground support.

Textview tag is already written in blank activity application therefore each & every time you have create a new application project using Android Studio or Eclipse the textView tag is already written there in activity_main.xml file.

Android Plain TextView example including tutorial.

This below tag code is TextView tag with width, height and text attributes.

<TextView
   android:layout_width="wrap_content"
   android:layout_height="wrap_content"
   android:text="This the text view text box." />


Note : When you create textview tag in android application then you don't have to define any external code in MainActivity.java programming file to display text box. if you write TextView tag in activity_main.xml layout file then it will be automatically called and show text on app screen.

activity_main.xml file 

<RelativeLayout xmlns:android="http://schemas.android.com/apk/res/android"
    xmlns:tools="http://schemas.android.com/tools"
    android:layout_width="match_parent"
    android:layout_height="match_parent"
    android:paddingBottom="@dimen/activity_vertical_margin"
    android:paddingLeft="@dimen/activity_horizontal_margin"
    android:paddingRight="@dimen/activity_horizontal_margin"
    android:paddingTop="@dimen/activity_vertical_margin"
    tools:context="com.tutorials2make.androidplaintext.MainActivity" >

    <TextView
        android:layout_width="wrap_content"
        android:layout_height="wrap_content"
        android:text="This the text view text box." />

</RelativeLayout>

Source code for MainActivity.java file

package com.tutorials2make.androidplaintext;

import android.support.v7.app.ActionBarActivity;
import android.os.Bundle;
import android.view.Menu;
import android.view.MenuItem;


public class MainActivity extends ActionBarActivity {

    @Override
    protected void onCreate(Bundle savedInstanceState) {
        super.onCreate(savedInstanceState);
        setContentView(R.layout.activity_main);
    }

    @Override
    public boolean onCreateOptionsMenu(Menu menu) {
        // Inflate the menu; this adds items to the action bar if it is present.
        getMenuInflater().inflate(R.menu.main, menu);
        return true;
    }

    @Override
    public boolean onOptionsItemSelected(MenuItem item) {
        // Handle action bar item clicks here. The action bar will
        // automatically handle clicks on the Home/Up button, so long
        // as you specify a parent activity in AndroidManifest.xml.
        int id = item.getItemId();
        if (id == R.id.action_settings) {
            return true;
        }
        return super.onOptionsItemSelected(item);
    }
}

Saturday, 3 October 2015

How to start fresh Android project using Eclipse

Eclipse is the extremely used IDE for android development purpose.Eclipse is also an alternative of Android studio because android studio must needs 2GB ram and works perfectly on 4GB of ram however eclipse dose not required 4GB ram. So eclipse ide is also an choice for low configuration older computer systems. Because every one on the earth cannot afford high performance costly computer to start their career as android developer. So if you have lower configuration pc then you don't need to be worry because eclipse is here. In this tutorial i am exposing you to start your first android application project via Eclipse Juno IDE.

Step by step setting up Eclipse IDE for android app development.

Before start making apps via eclipse you need to stabilize eclipse ide platform to android app development platform. So follow the below steps very carefully.

1. Download Eclipse.


3. After done all procedure your Eclipse is ready to develop android apps. Now click on File > New > Android Application project.


4. Enter application name, Project name, Package name other settings leave same.


5. Renounce all the options same.


6. Configure launcher icon ( Launcher icon is the app launching icon shows on the mobile phone menu ). If you do not have the icon at app configuration time so you can also replace icon after all this process form eclipse project window.


7. Create activity, if this is your first application project on eclipse then select blank activity.


8. Set the activity name and layout name then click on Finish button.


Now enjoy app developing with Eclipse.

Friday, 2 October 2015

Things need to know Before start android app development

Android is one of the largest selling mobile operating system all over the globe. Android is an mobile os so its offers thousands of mobile applications through Google play store. You can download free apps like Mobile gaming applications, other utility apps. Android apps covered more than 60% mobile gaming market all over the earth, So seeing future as an android mobile app developer is nice. There are lot's of online institutes providing online app learning facility. Therefore i am giving a little introduction about how to start your own online android app designing & development.

Why Android app development is extremely superior then others..?

Opportunity :
If you are looking in order to start your own online development career then i preferred  you to pick android application development as your future career because there are so much possibilities inside it. Android is growing all over the world covering up thousands of mobile devices, tablets, wearable devices, TV's even cars. Supposing you can create one working usable android app that will be run on every android device without adding extra coding, Therefore your application will be device friendly. 

Platform friendly :
Android supports platform friendly development because single application can run though all device platform there is no need to design unique app for each & every device.

Free development Tools :
Android is free mobile phone operating system so its development tools also freely available on Google developers. You can get Android studio + SDK manger. 

Also read: 

Brief introduction about android files, Most usable assignment functions, Variables, Launcher icon, Activity, .xml layout files, String file.


This above is the programmatic folder structure for of android application.

Android development objective Files :

  1. MainActivity.java programming file - MainActivity.java programming file is the extreme part of android application development because all the application beginning to finish core programming is written on this file. You can add more programming files but this is the main file, all other files function, classes would call from this file.
  2. Activity_main.xml file - Activity_main.xml file is layout file. Layout file represents all the layout blue print of application including designing part like setting up text box, check box, images, videos...etc.
  3. Strings.xml file - Strings.xml file contains all the string values that can be used in applications, you can define any custom string character value on here and call anywhere in program.
  4. AndroidManifest.xml file - AndroidManifest.xml file restrain application package name, android minimum sdk version, android target sdk version, app icon path, permissions etc.

Creating android virtual device ( AVD ) in Eclipse

As we all understand that Eclipse is as well most advantageous IDE ( Integrated development environment ) for android apps development purpose. Eclipse allows us to build android apps, test android apps via android emulator also known as android virtual device, app debugging system to discover errors, graphical user interface, drag n drop customization. But the most usable factor is to test developed android apps via android emulator ( Android mobile simulation device on computer ).

Also read : How to create Android virtual device in Android studio.


Creating Android virtual device in Eclipse on Widows. 


1. Start Eclipse on your computer.

2. Click on Android virtual device ( AVD ) manager.


3. Now click on Create button to create your own avd.


4. Set AVD name, AVD target device, target android operating system version, CUP/ABI , keyboard, Skin, Front camera, back camera, memory option, VM heap memory, internal storage, SD card storage, emulation options, User host gpu.


5. After all that configuration just select your avd from given avd list and click on start button.


Screenshots of Android virtual device.


How to create an Android virtual device (AVD) in Android Studio

What is Android virtual device ( AVD ).

Android virtual device is an android emulator virtual graphical user interface just like the android mobile phones, tablets. AVD grants permission to developer to test their developed apps like original mobile phone ability. The motive to construct ADV manager is to provide comfort directly to developer so application can be test on computer via avd emulator. AVD emulator provide real time android mobile phone atmosphere on computer. ADV allows the appropriator to test their applications on it.


Benefits of usage AVD manger in computer.

  • You don't need to connect android mobile phone device via data cable to test your applications.
  • Test, execute android apps straight on your computer.
  • Much better perceive then mobile phone because you can show apps activity undertaking logs via logs panel.

Step by step tutorial to create an android virtual device in android studio.

1. Start android studio on your computer.

2. Click on AVD Manger icon.


3. After that click on Create a virtual device.


4. Now choose your hardware device according to screen size, There are 4 different type of categories available Phone, tablet, wear and tv. Click on Next.


5. Now select system image, system image is all of your previously installed android versions. You can choose any system image as per your demand of project.


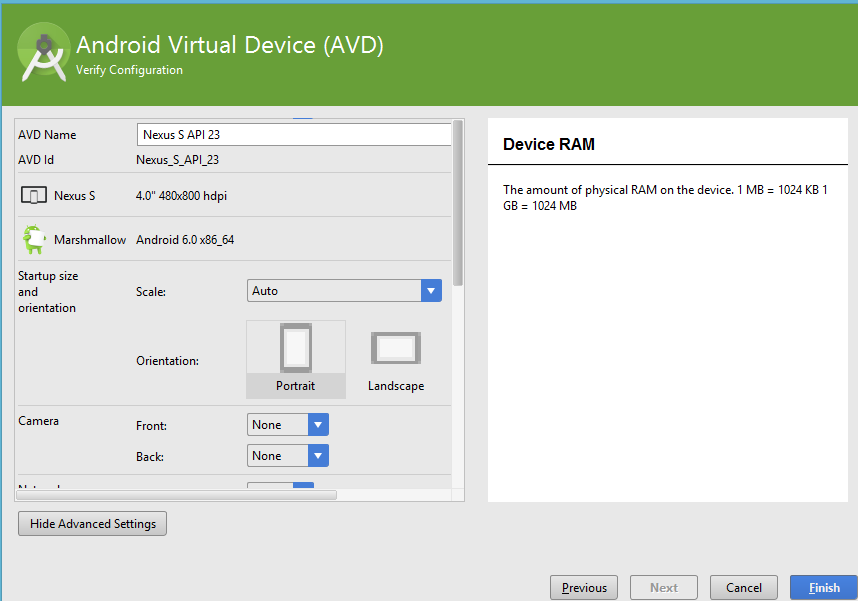
6. On the next window you have to verify configuration of your choose system image. If you are choosing Android Marshmallow api 23 then you need to set ram ( Random access memory ) size as 1GB and click on finish.


7. Here you go friends after all this procedure your android virtual device is successfully created. Now click on small play icon to run avd.

Note : If you are facing this ERROR: x86 emulation currently requires hardware acceleration. So read my solution article.

Tuesday, 29 September 2015

Solution ERROR:x86 emulation currently requires hardware acceleration

Solution for cannot launch ADV in emulator.

ADV ( Android virtual device ) emulator is same as the other android versions installed on mobile phones, tablets. But when we trying to create ADV in android studio or eclipse then a normally a error occurs that,


Cannot launch ADV in emulator. 
Output:
emulator: ERROR: x86 emulation currently requires hardware acceleration.
Please ensure Intel HAXM is properly installed and usable.
CUP acceleration status: HAX kernal module is not installed.

Solution for this error is very easy because android sdk tools itself give the proper Intel HAXM software but we have to install this software manually from sdk installation directory.

How to solve ERROR: x86 emulation currently requires hardware acceleration on windows computer.

  1. Run your SDKmanager.exe.
  2. Download Intel x86 emulator accelerator( HAXM installer ).
  3. After downloading goto your SDK Manager folder -> extras -> intel -> Hardware_Accelerated_Execution_Manager -> intelhaxm-android.exe & install intel haxm software. Now restart your computer and your HAXM problem is completely solved. If this dose n't work for you right your can find HAXM software here.

Monday, 28 September 2015

How to import existing Eclipse android project into Android Studio

About Eclipse IDE

Eclipse is an integrated development environment ( IDE ) just like Android studio but it is so much older that android studio. Eclipse was released on November 7, 2001. Eclipse is basically used for development purpose for approximately all programming languages after add there particular language plugins. The main purpose of eclipse is to develop java applications but after evolving in all those years you can develop more than 10 language application software in it. The languages are as follows:

  • C
  • C++
  • COBOL
  • FORTRAN
  • HASKELL
  • JAVA SCRIPT
  • LASSO
  • PERL
  • PHP
  • JAVA
  • PYTHON
  • RUBY
  • LUA
  • NATURAL....etc.

Before import existing eclipse android project into android studio you need to make sure, these below requirements are available .

  1. Working eclipse complete android project.
  2. Working android studio connected with SDK Manager.

Steps to import eclipse android development project into Android studio.

  1. Run android studio on computer.
  2. Select import project Eclipse ADT.
  3. Select Eclipse project directory folder path.
  4. Now it will ask you to create a full copy of your eclipse project into android studio project save folder.
  5. Check all three given options. Replace jars with dependencies, Replace library source with dependencies, Create Gradle-style.
After a moment it will successfully done the importing process and open your android project into android studio IDE. Now you can continue your project in studio.There is also a another method for importing project via File Menu -> New -> Import project.


How to start new android application project using Android Studio 1.3.2

About android studio.

Android studio is an free IDE(Integrated development environment ) software provided by Google.com. The purpose of android studio is for developing android applications project. Android studio is freely available under Apache 2.0 license. It is based upon Intellij IDEA platform. You can download android studio via Google developers official page.

System requirements.

Android studio is available for mainly 3 operating systems, Windows, Mac 0S X, Linux. So here is all the computer system hardware requirement. 

Windows

  • Microsoft windows 7, Windows 8, Windows xp 2003 edition, Windows vista (32 bit & 64 bit).
  • Minimum 2 GB ram but recommended is 4 GB.
  • 500 MB hard disk empty space.
  • Screen resolution is 1280 * 800 minimum.
  • JDK( Java development kit ) 7.

Mac OS X

  • Mac OS X 10.8.5 or higher version.
  • Minimum 2 GB ram but recommended is 4 GB.
  • 500 MB hard disk empty space.
  • Screen resolution is 1280 * 800 minimum.
  • JDK( Java development kit ) 7.
  • JRE( Java run time environment ).

Linux

  • GNU C library 2.15 or higher version.
  • Minimum 2 GB ram but recommended is 4 GB.
  • 500 MB hard disk empty space.
  • Screen resolution is 1280 * 800 minimum.
  • Oracle JDK 7.

How to start a new android app project using Android studio on Windows 7, Windows 8.1, Windows 10.

  1. Run Android studio with Administrator privileges on windows 7 to higher versions.
  2. Select Start a new android studio project.
  3. After that write down the application name, domain package name, project save location path.
  4. Select platforms for your application to run. You can choose multiple platforms for your app like Phone & tablets, wearable devices, Android TV, android auto ( cars ).
  5. On the next selection page you have to select activity for your application there are basically 11 types of activities available. I preferred you to choose blank activity for your first development project.
  6. Enter Activity name, layout file name, title, Menu resource name.
After configure and customize all settings your first android application project will be start.

Sunday, 27 September 2015

How to set environment variables on Windows PC for Android Development

Before start developing android applications there is a major factor that we have to set environment variables on windows computer, without environment variable we cannot develop android applications.

What is environment variable definition.

Environment variable means %windir% , The path of windows installed folders & files. This variable contains all the folders including sub files path of windows files, That means it knows where your windows installation directory is located.

Why setting up environment variable is so much important on android app development purpose.

Set up variables setting on computer before starting android app development is so much important because, there are multiple sub files & folder include on Android SDK Tools every folder has its unique files to run, compile, design, android applications. SDK package also contains built in libraries, android emulator, android system image according to version of android, add-on's, build tools, helping documents, all installed android platforms, source codes. When we set up environment variable, it tells windows computer where Android SDK folder is located on computer. So each and every time when Eclipse or Android studio is start, it will automatically call & compile android sdk tools, platform tools, JDK( java development kit) bin folder.
JDK installed folder path setup is so much important for android development because android files compiled on java bin path.

How to set environment variables on Windows 8.1, Windows 10, Windows 7, 32 bit & 64 bit versions.

  1. Right click on My Computer -> Properties.
  2. Select Advanced system settings.
  3. Select Advanced -> Environment variables.
  4. Under System variables click on New. Set variable name as JAVA_HOME & Variable value as C:\Program Files (x86)\Java\jdk1.7.0_72 and save it.
  5. After that find Path variable and edit, then paste here Android sdk manager platform tools, tools folder path. Like my sdk installed platform tools folder path is F:\Software\Android Development\SDK Manager\platform-tools and tools folder path is F:\Software\Android Development\SDK Manager\tools . Save all these settings and after that restart your computer.