Tuesday, 6 October 2015

Android Simple TextView example tutorial

Android TextView tag is applied to display user generated text on android applications. TextView tag is the most common generic tag to develop static android apps. TextView tag also gives the facility to change the text bye application developer. TextView dose not function single there are some of it's attributes to provide TextView ground support.

Textview tag is already written in blank activity application therefore each & every time you have create a new application project using Android Studio or Eclipse the textView tag is already written there in activity_main.xml file.

Android Plain TextView example including tutorial.

This below tag code is TextView tag with width, height and text attributes.

<TextView
   android:layout_width="wrap_content"
   android:layout_height="wrap_content"
   android:text="This the text view text box." />


Note : When you create textview tag in android application then you don't have to define any external code in MainActivity.java programming file to display text box. if you write TextView tag in activity_main.xml layout file then it will be automatically called and show text on app screen.

activity_main.xml file 

<RelativeLayout xmlns:android="http://schemas.android.com/apk/res/android"
    xmlns:tools="http://schemas.android.com/tools"
    android:layout_width="match_parent"
    android:layout_height="match_parent"
    android:paddingBottom="@dimen/activity_vertical_margin"
    android:paddingLeft="@dimen/activity_horizontal_margin"
    android:paddingRight="@dimen/activity_horizontal_margin"
    android:paddingTop="@dimen/activity_vertical_margin"
    tools:context="com.tutorials2make.androidplaintext.MainActivity" >

    <TextView
        android:layout_width="wrap_content"
        android:layout_height="wrap_content"
        android:text="This the text view text box." />

</RelativeLayout>

Source code for MainActivity.java file

package com.tutorials2make.androidplaintext;

import android.support.v7.app.ActionBarActivity;
import android.os.Bundle;
import android.view.Menu;
import android.view.MenuItem;


public class MainActivity extends ActionBarActivity {

    @Override
    protected void onCreate(Bundle savedInstanceState) {
        super.onCreate(savedInstanceState);
        setContentView(R.layout.activity_main);
    }

    @Override
    public boolean onCreateOptionsMenu(Menu menu) {
        // Inflate the menu; this adds items to the action bar if it is present.
        getMenuInflater().inflate(R.menu.main, menu);
        return true;
    }

    @Override
    public boolean onOptionsItemSelected(MenuItem item) {
        // Handle action bar item clicks here. The action bar will
        // automatically handle clicks on the Home/Up button, so long
        // as you specify a parent activity in AndroidManifest.xml.
        int id = item.getItemId();
        if (id == R.id.action_settings) {
            return true;
        }
        return super.onOptionsItemSelected(item);
    }
}

Saturday, 3 October 2015

How to create MySQL database & tables using phpmyadmin

What is MySQL database.

Full form of MySQL is my structured query language. MySQL is open source database management system used by millions of websites, applications, software to store their data in it. Database is a place where all the text format information collect on a single location in Tabular format. MySQL database hold most useful position on dynamic web application development scope.

Why MySQL database is extremely important in php development ?

Because dynamic php websites invoke all of there text statements from MySQL database each & every time web page reloads. Absence of database, web server can not serve dynamic content. Every database contain tables. Tables are the combination of rows and columns. There are thousands of tables in a database and everyone of them endue rows + columns structure to hold the information. Every part of information is saved on columns.

How to create MySQL database in phpmyadmin.


1. The primarily step to create database is Install XAMPP APACHE SERVER so read my guide for installation.

2. After completing installation and stat the Apache & MySQL server open your web browser.

3. Type localhost/phpmyadmin in the url bar then press enter.


4. Click on New.


5. Enter your database name then click on Create button.


6. After press Create button you will see a message " Database YourDatabaseName has been created ".

-
To Open your existing database in PHPMYADMIN exclusively click on it.


Creating tables in phpmyadmin.

1. Select & open your database -> Enter your table name and column count.( Columns are the part of tables like id, name, father_name, address. age ).

2. Now enter column name, Type ( Data type), length Values and if you are creating id column name then you must have to define id increment A_I .


After done all the process it will show newly created table.


How to start fresh Android project using Eclipse

Eclipse is the extremely used IDE for android development purpose.Eclipse is also an alternative of Android studio because android studio must needs 2GB ram and works perfectly on 4GB of ram however eclipse dose not required 4GB ram. So eclipse ide is also an choice for low configuration older computer systems. Because every one on the earth cannot afford high performance costly computer to start their career as android developer. So if you have lower configuration pc then you don't need to be worry because eclipse is here. In this tutorial i am exposing you to start your first android application project via Eclipse Juno IDE.

Step by step setting up Eclipse IDE for android app development.

Before start making apps via eclipse you need to stabilize eclipse ide platform to android app development platform. So follow the below steps very carefully.

1. Download Eclipse.


3. After done all procedure your Eclipse is ready to develop android apps. Now click on File > New > Android Application project.


4. Enter application name, Project name, Package name other settings leave same.


5. Renounce all the options same.


6. Configure launcher icon ( Launcher icon is the app launching icon shows on the mobile phone menu ). If you do not have the icon at app configuration time so you can also replace icon after all this process form eclipse project window.


7. Create activity, if this is your first application project on eclipse then select blank activity.


8. Set the activity name and layout name then click on Finish button.


Now enjoy app developing with Eclipse.

Friday, 2 October 2015

Things need to know Before start android app development

Android is one of the largest selling mobile operating system all over the globe. Android is an mobile os so its offers thousands of mobile applications through Google play store. You can download free apps like Mobile gaming applications, other utility apps. Android apps covered more than 60% mobile gaming market all over the earth, So seeing future as an android mobile app developer is nice. There are lot's of online institutes providing online app learning facility. Therefore i am giving a little introduction about how to start your own online android app designing & development.

Why Android app development is extremely superior then others..?

Opportunity :
If you are looking in order to start your own online development career then i preferred  you to pick android application development as your future career because there are so much possibilities inside it. Android is growing all over the world covering up thousands of mobile devices, tablets, wearable devices, TV's even cars. Supposing you can create one working usable android app that will be run on every android device without adding extra coding, Therefore your application will be device friendly. 

Platform friendly :
Android supports platform friendly development because single application can run though all device platform there is no need to design unique app for each & every device.

Free development Tools :
Android is free mobile phone operating system so its development tools also freely available on Google developers. You can get Android studio + SDK manger

Also read

Brief introduction about android files, Most usable assignment functions, Variables, Launcher icon, Activity, .xml layout files, String file.


This above is the programmatic folder structure for of android application.

Android development objective Files :

  1. MainActivity.java programming file - MainActivity.java programming file is the extreme part of android application development because all the application beginning to finish core programming is written on this file. You can add more programming files but this is the main file, all other files function, classes would call from this file.
  2. Activity_main.xml file - Activity_main.xml file is layout file. Layout file represents all the layout blue print of application including designing part like setting up text box, check box, images, videos...etc.
  3. Strings.xml file - Strings.xml file contains all the string values that can be used in applications, you can define any custom string character value on here and call anywhere in program.
  4. AndroidManifest.xml file - AndroidManifest.xml file restrain application package name, android minimum sdk version, android target sdk version, app icon path, permissions etc.

Creating android virtual device ( AVD ) in Eclipse

As we all understand that Eclipse is as well most advantageous IDE ( Integrated development environment ) for android apps development purpose. Eclipse allows us to build android apps, test android apps via android emulator also known as android virtual device, app debugging system to discover errors, graphical user interface, drag n drop customization. But the most usable factor is to test developed android apps via android emulator ( Android mobile simulation device on computer ).

Also read : How to create Android virtual device in Android studio.


Creating Android virtual device in Eclipse on Widows. 


1. Start Eclipse on your computer.

2. Click on Android virtual device ( AVD ) manager.


3. Now click on Create button to create your own avd.


4. Set AVD name, AVD target device, target android operating system version, CUP/ABI , keyboard, Skin, Front camera, back camera, memory option, VM heap memory, internal storage, SD card storage, emulation options, User host gpu.


5. After all that configuration just select your avd from given avd list and click on start button.


Screenshots of Android virtual device.


How to create an Android virtual device (AVD) in Android Studio

What is Android virtual device ( AVD ).

Android virtual device is an android emulator virtual graphical user interface just like the android mobile phones, tablets. AVD grants permission to developer to test their developed apps like original mobile phone ability. The motive to construct ADV manager is to provide comfort directly to developer so application can be test on computer via avd emulator. AVD emulator provide real time android mobile phone atmosphere on computer. ADV allows the appropriator to test their applications on it.


Benefits of usage AVD manger in computer.

  • You don't need to connect android mobile phone device via data cable to test your applications.
  • Test, execute android apps straight on your computer.
  • Much better perceive then mobile phone because you can show apps activity undertaking logs via logs panel.

Step by step tutorial to create an android virtual device in android studio.

1. Start android studio on your computer.

2. Click on AVD Manger icon.


3. After that click on Create a virtual device.


4. Now choose your hardware device according to screen size, There are 4 different type of categories available Phone, tablet, wear and tv. Click on Next.


5. Now select system image, system image is all of your previously installed android versions. You can choose any system image as per your demand of project.


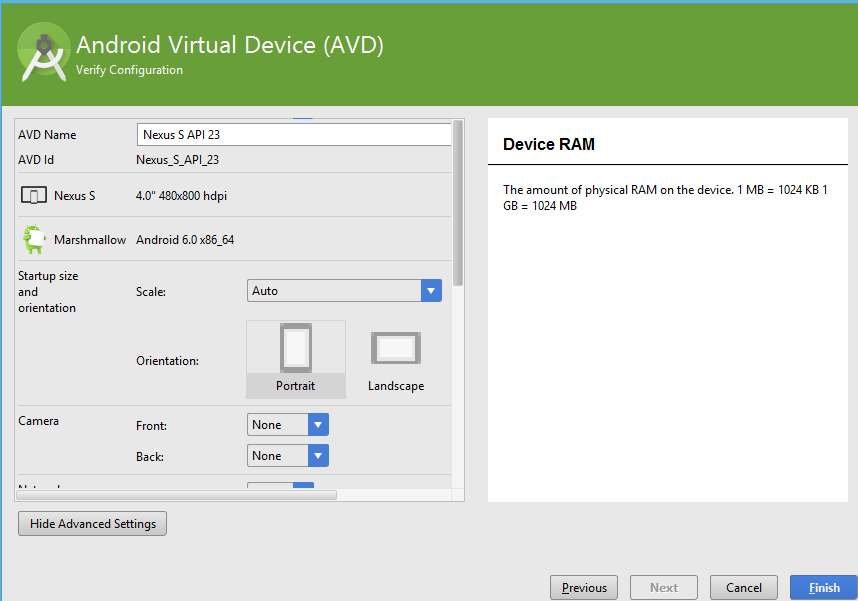
6. On the next window you have to verify configuration of your choose system image. If you are choosing Android Marshmallow api 23 then you need to set ram ( Random access memory ) size as 1GB and click on finish.


7. Here you go friends after all this procedure your android virtual device is successfully created. Now click on small play icon to run avd.

Note : If you are facing this ERROR: x86 emulation currently requires hardware acceleration. So read my solution article.

Thursday, 1 October 2015

How to verify My Website ownership to Google search engine

The fastest way to index my website on Google.

Google.com is famous internet search engine available to search anything on internet. Google search engine owned by Google Inc . Google is one of the most popular search engine on WWW ( World wide web ). Google is keeping more then 3 billion click per day, at the present date Google is one of the most usable online search engine.

Google is automatically crawl  every website on internet as per permission of website's robots.txt file and stores website cache on Google caching server so every time user makes a search query it will directly provide result from it's server. As we all know Google is one of the largest present search engine on internet and billions of people trying to find there search results on it, so growing your online business through your website can more easy if your website shows up on google search results. That can be happen only if your website is indexed on Google search index. This method is also called as " The fastest way to index my website on Google ".

Verify my website ownership to Google search engine can help me get fast indexing...How?

There are thousand of new online products strike up everyday and every one of them wants to grow their online business. So building your web content more accessible requirement you have to submit your website on one of the newly famous large scale growing online search engine Google. By submitting your product to Google it reaches fastly to Google search index. The fast you verify your product to Google, the fast you gain index in Google. 

Required conditions to verify your product on Google.

  • Your own website domain like .com , .org , .net , .club , .tech , .org , .in , .online , .design , .news , .app , .web , .family , live ...etc.
  • Access of your website webpages source code or access your web hosting sever via ftp ( file transfer protocol ) because you need to upload Google webmaster tool verification file on your server either you can add a custom meta tag to your website index home page. All this is a process to verifying your website ownership.

How to add my website on Google search index.


2. Log-in through your Google gmail account.

3. Click on ADD A PROPERTY.


4. Now add your website name then click on Continue.


After that all you have to do is follow the instructions given to you By Google webmaster tools to verify your website ownership on Google.